|
AI
NotebookLM Changed Completely: Here's What Matters (in 2026)
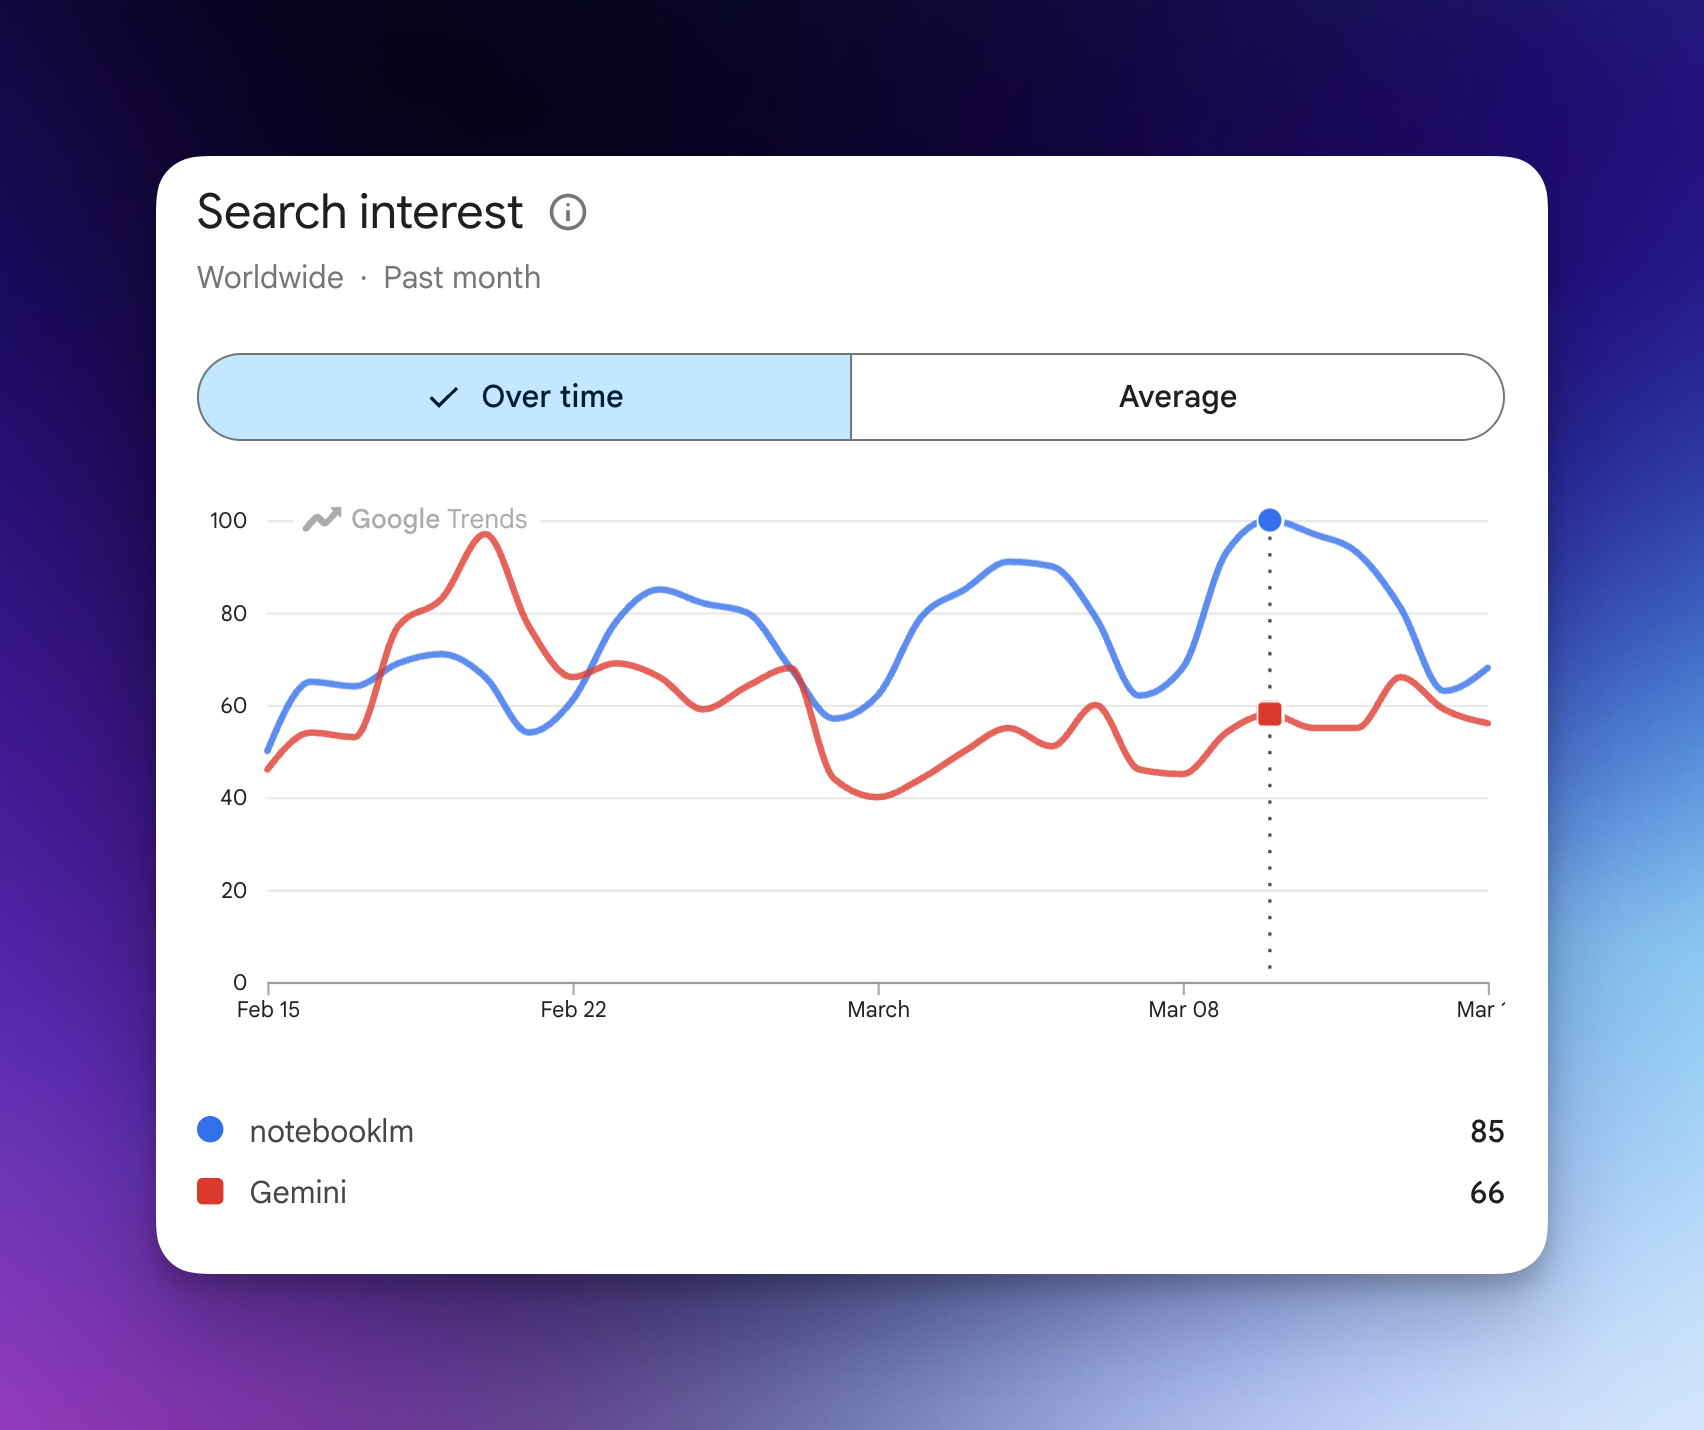
Hey friends - NotebookLM received a BUNCH of updates recently and according to Google Trends, NotebookLM is now more popular than even Gemini!
So, if you're still using NotebookLM the way you were a few weeks ago, you're missing out on some incredible capabilities. Let’s get you up to speed in this comprehensive guide!
Watch it in action
Resources
- Presentation Prompt Templates: The custom instruction templates referenced in this walkthrough, free to copy.
- HubSpot's Free AI Guide: A step-by-step guide covering 11 use cases for combining Deep Research with NotebookLM.
- Essential Power Prompts: A Notion library of 15 battle-tested prompts with video walkthroughs.
NotebookLM's Core Advantage
Even with all the updates, NotebookLM's core advantage has not changed. Here's a simple example:
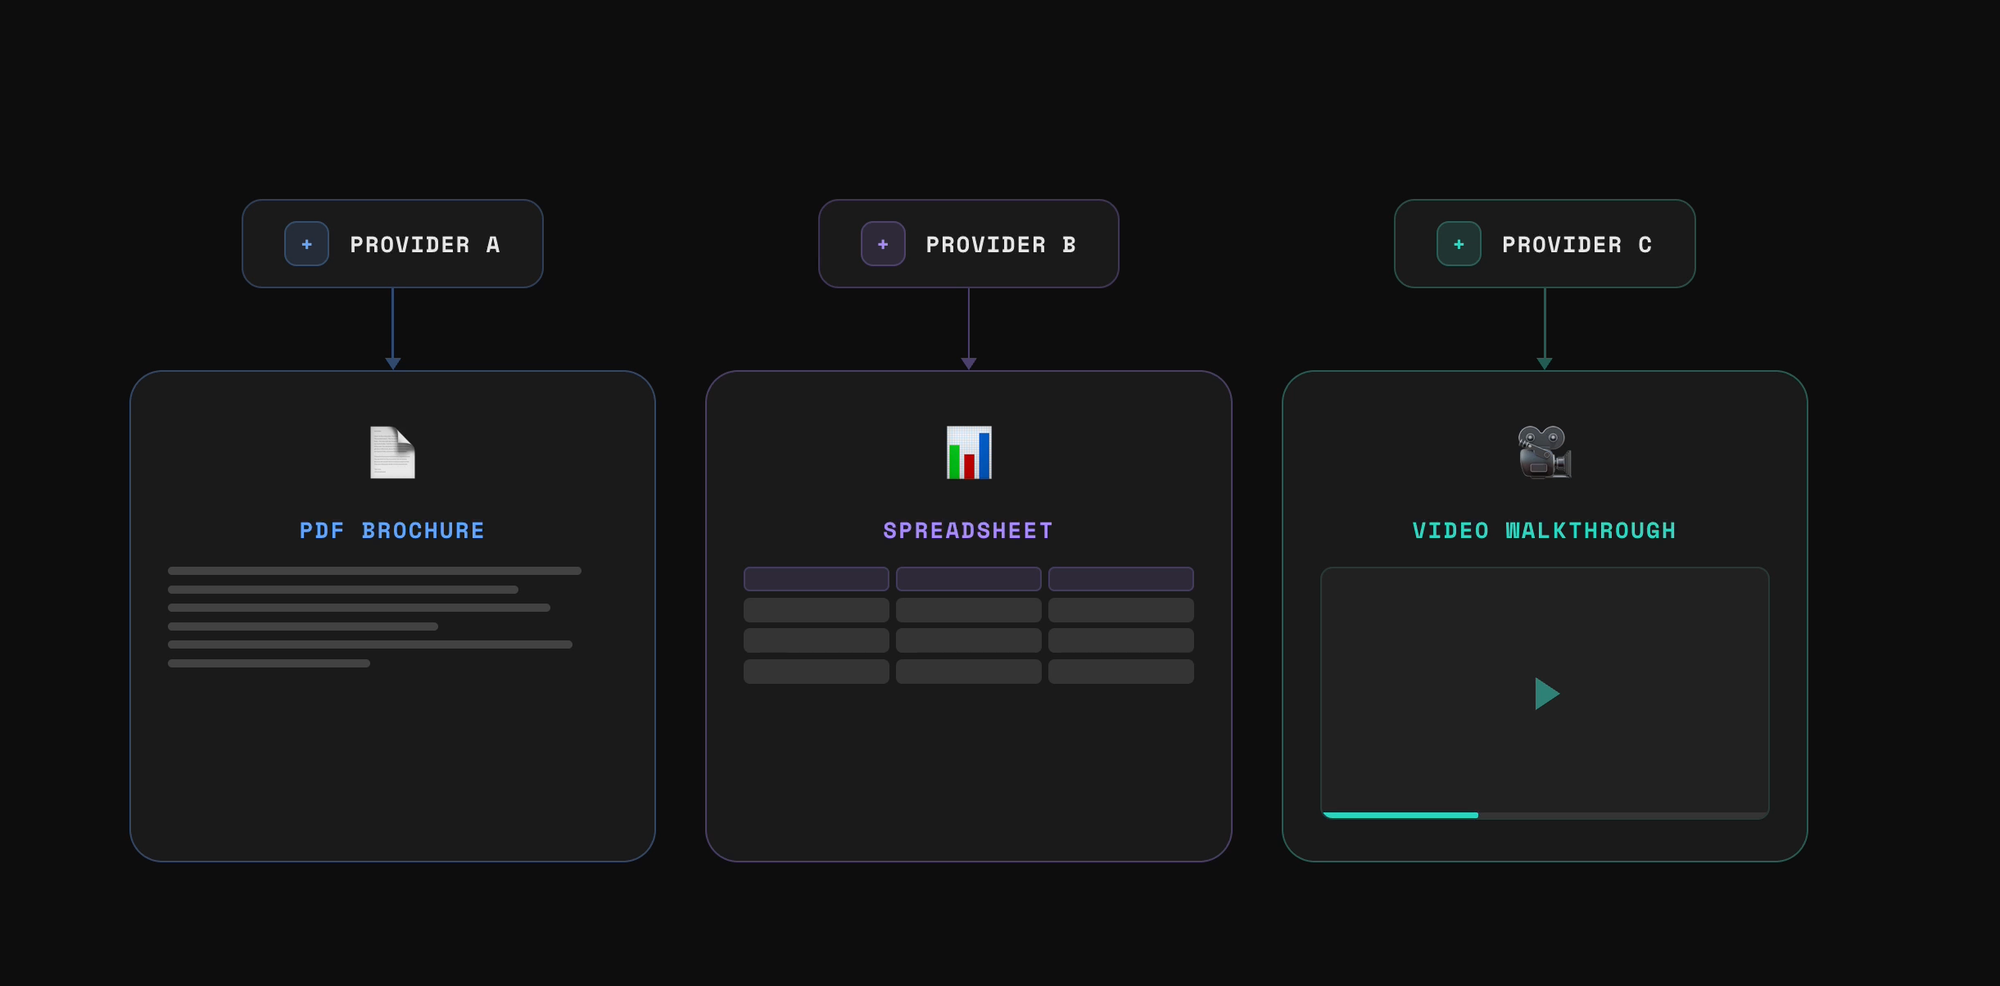
Three different health insurance providers send you their coverage options:
- The first gives you a PDF brochure.
- The second gives you a spreadsheet.
- The third recorded a video walkthrough.
Instead of digging through those materials, you just share them with NotebookLM and ask NotebookLM to find the provider with the best dental coverage.
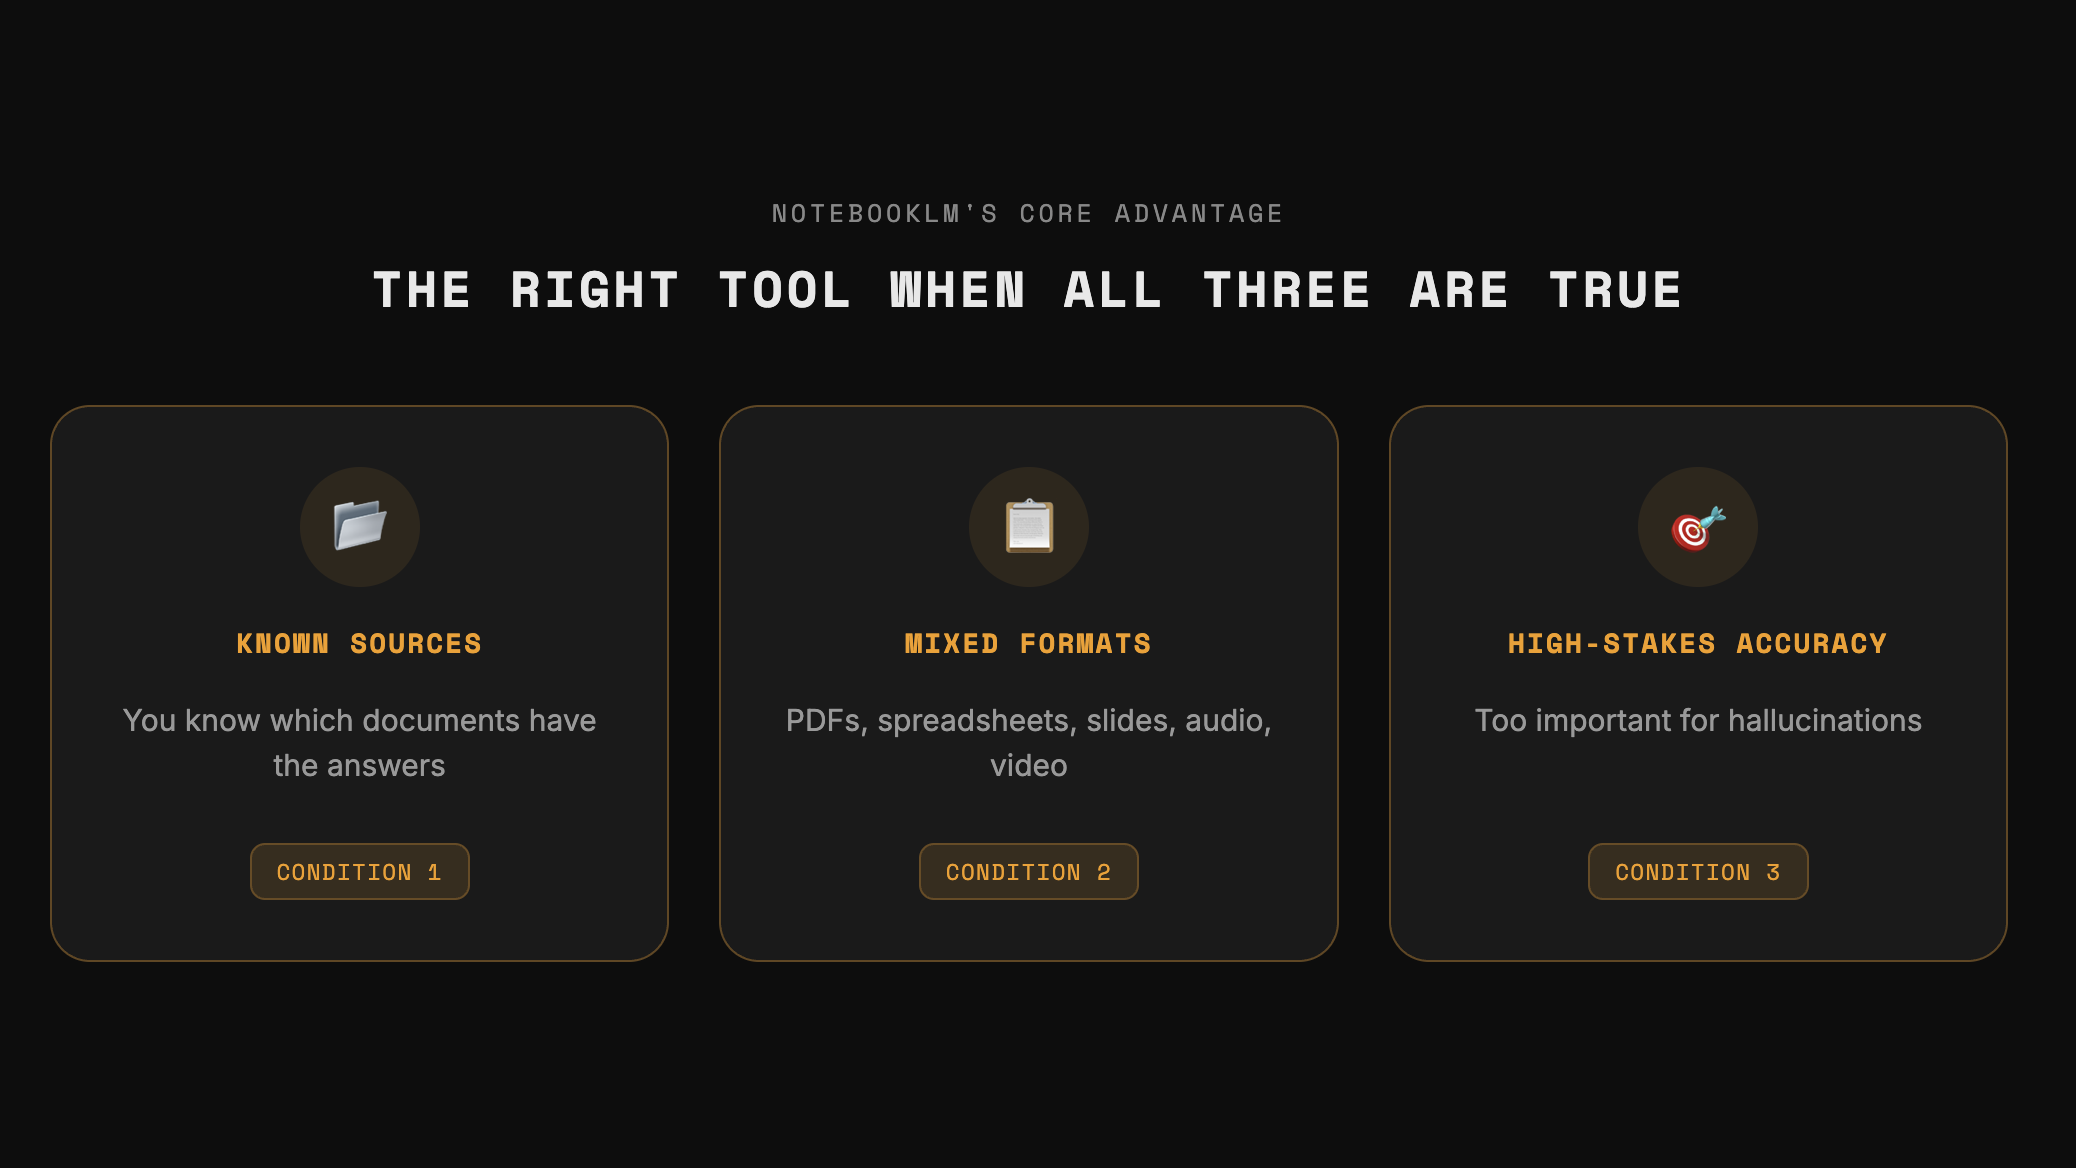
In other words, NotebookLM is still the perfect tool when three things are true:
- You already know which documents contain the answers and you just need help getting through them.
- Those sources are in different formats or mediums (PDFs, spreadsheets, slides, text, audio, video) and no single one gives you the full picture.
- You need the AI to stick to what's actually in the documents and not make things up, because the stakes are too high for hallucinations.
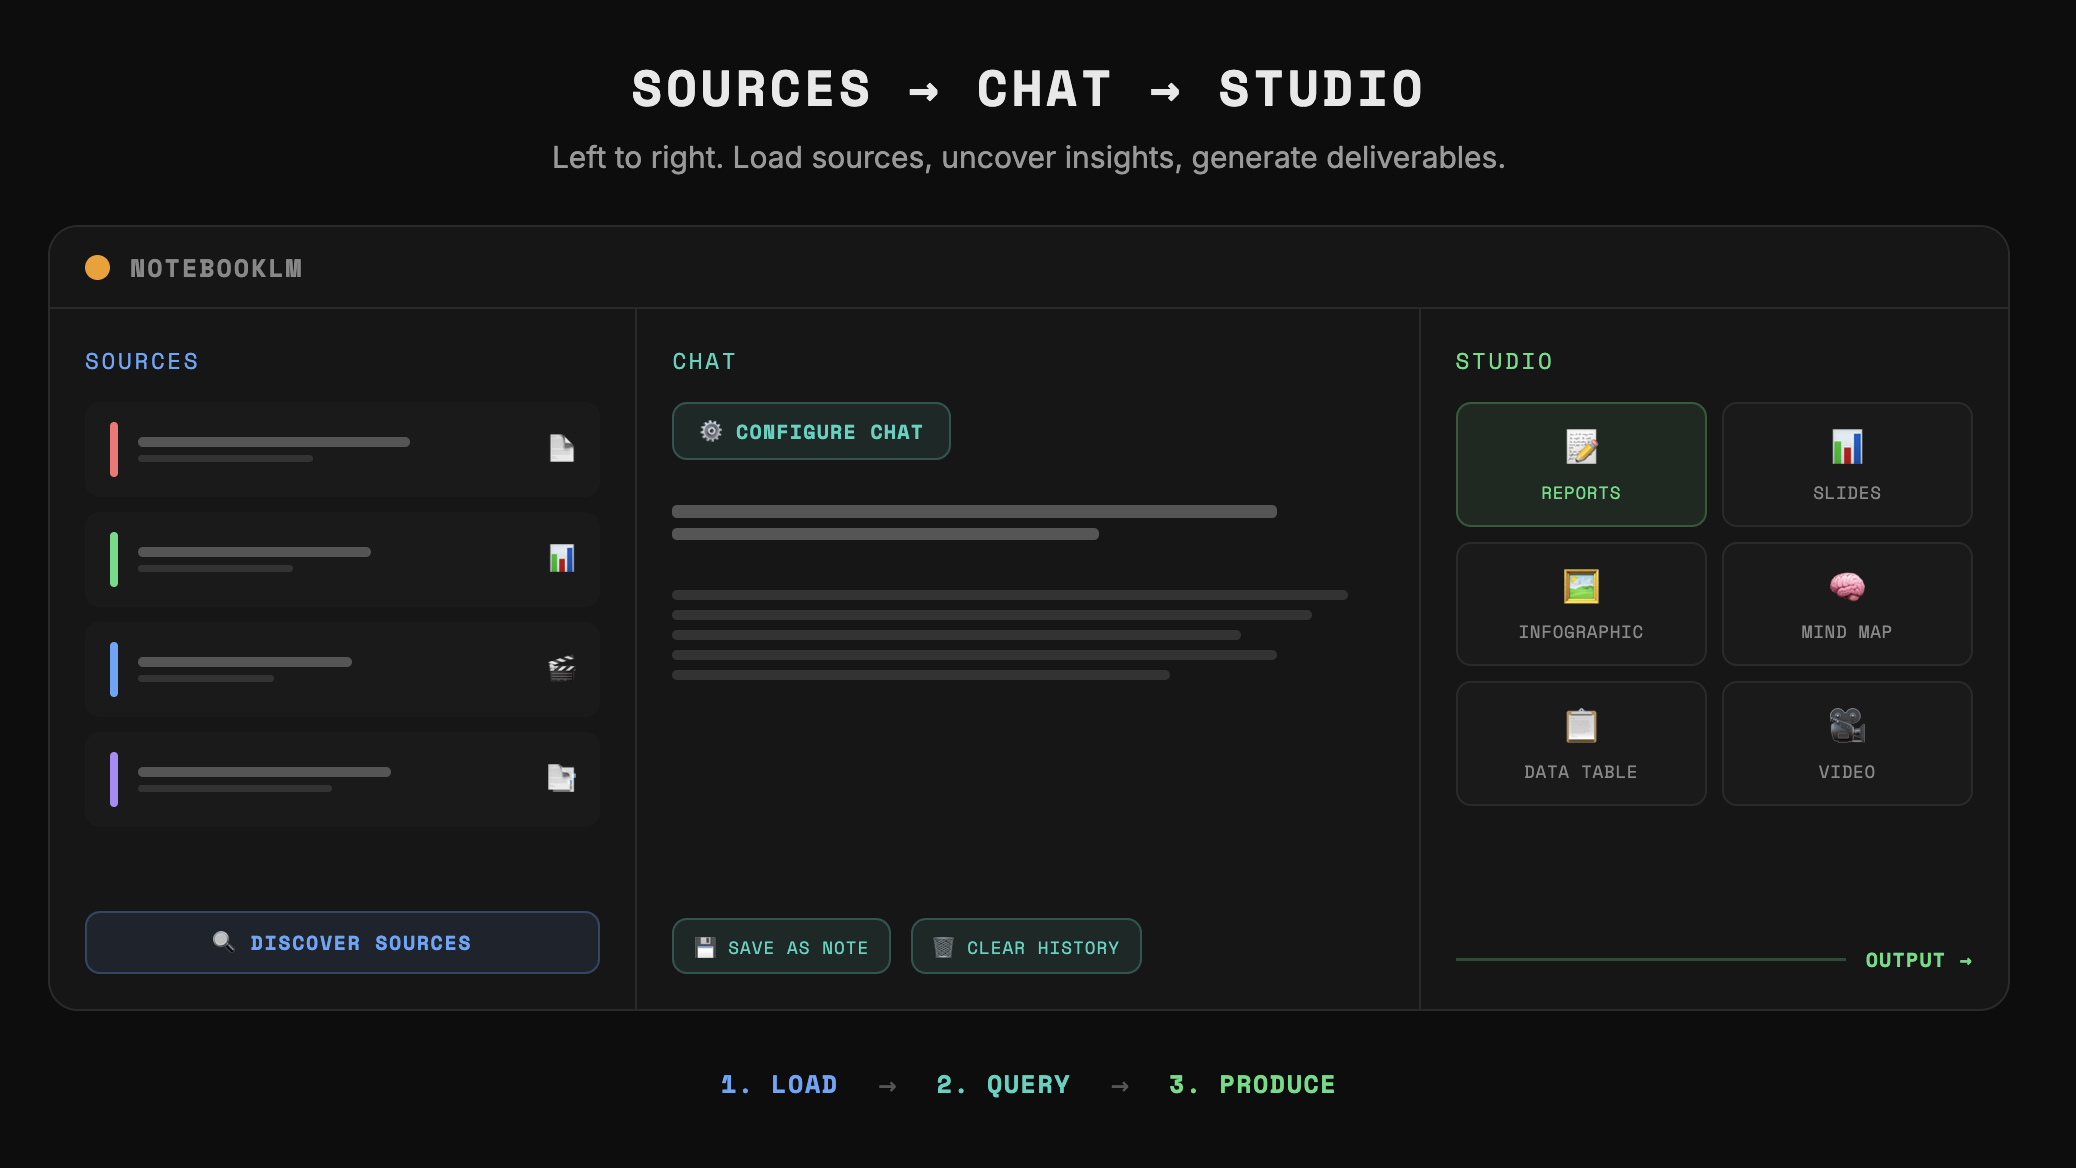
The Three-Column Layout
Within the app, there’s a simple three-column layout and the way to use it is to just go from left to right.
- Sources Panel (left): This is where you add everything NotebookLM needs to work with. You're telling NotebookLM: "The answers are in here somewhere."
- Chat Panel (middle): This is where you interact with your sources by asking questions, requesting summaries, or pulling out specific details.
- Studio Panel (right): This is where you generate actual deliverables you can use in the real world, things like reports and slide decks.
Sources Panel
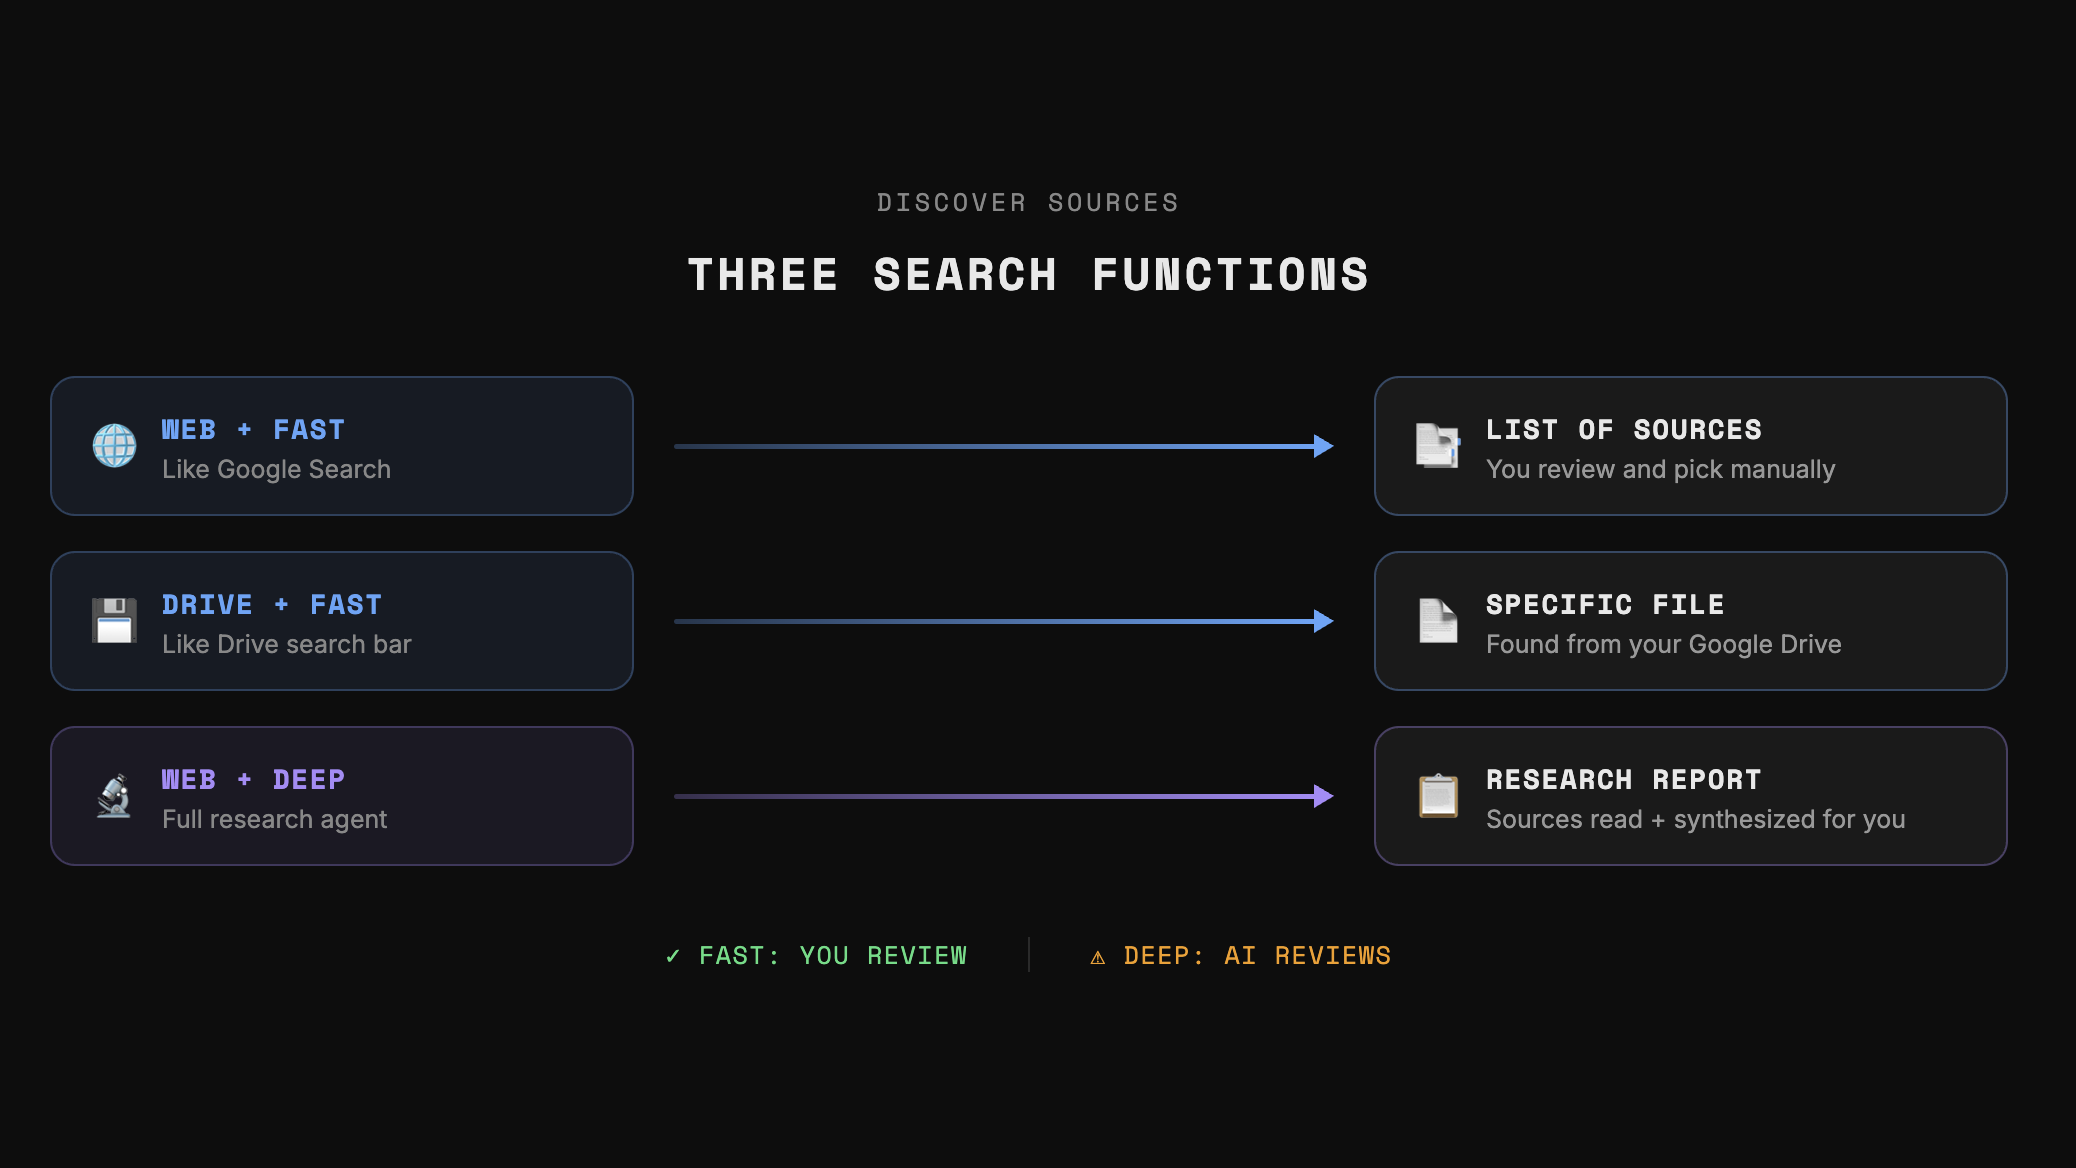
The Sources Panel received a big overhaul with three new “search functions” designed to help you close the information gap between:
- Sources you currently have
- Information you still need
Let’s walk through each function:
Web + Fast Research
Treat this like Google Search. I can type "Top 5 AI models by usage in the Japan market with monthly active users for each model" and NotebookLM returned a list of sources (like Google Search would) for me to review.
Even if one of the results were in a different language, you can still add it because NotebookLM answers your questions in English regardless.
Drive + Fast Research
Treat this like the Google Drive search bar. I typed something like "Find that report with the AI model statistics on the Japan market" and found the file without having to dig through Drive.
Web + Deep Research
This combination finds sources AND synthesizes them into a full research report you can add as a source, along with the list of sources it pulled from.
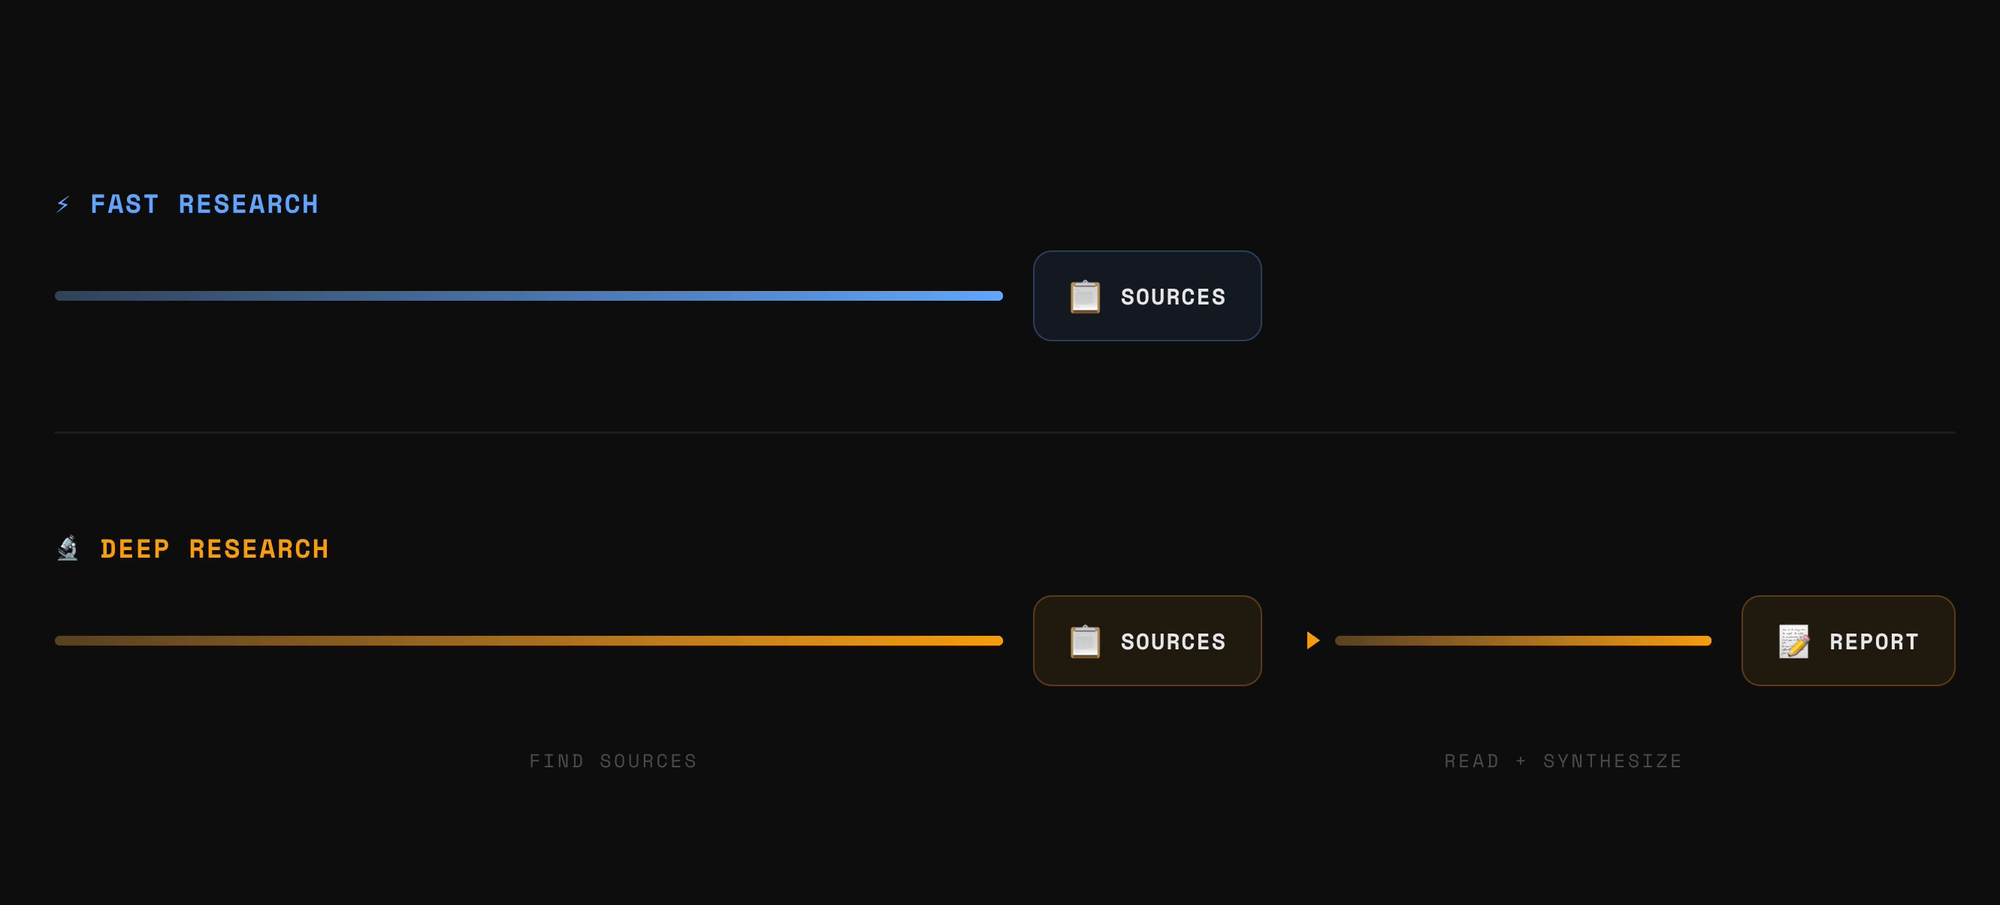
Put simply: Fast Research gives you a list of sources to manually review. Deep Research reads those sources and writes a report for you.
While that sounds great in theory, I don't recommend using Deep Research here for two reasons:
- If you have any domain expertise on the topic, you can probably filter out low-quality sources better than NotebookLM.
- The Deep Research tools in Gemini, ChatGPT, and Claude just perform better.
💡
Pro tip: If you add Google Docs, Slides, or Sheets as sources, they're treated as living documents, meaning you can fetch the latest changes. PDFs, on the other hand, are static uploads.
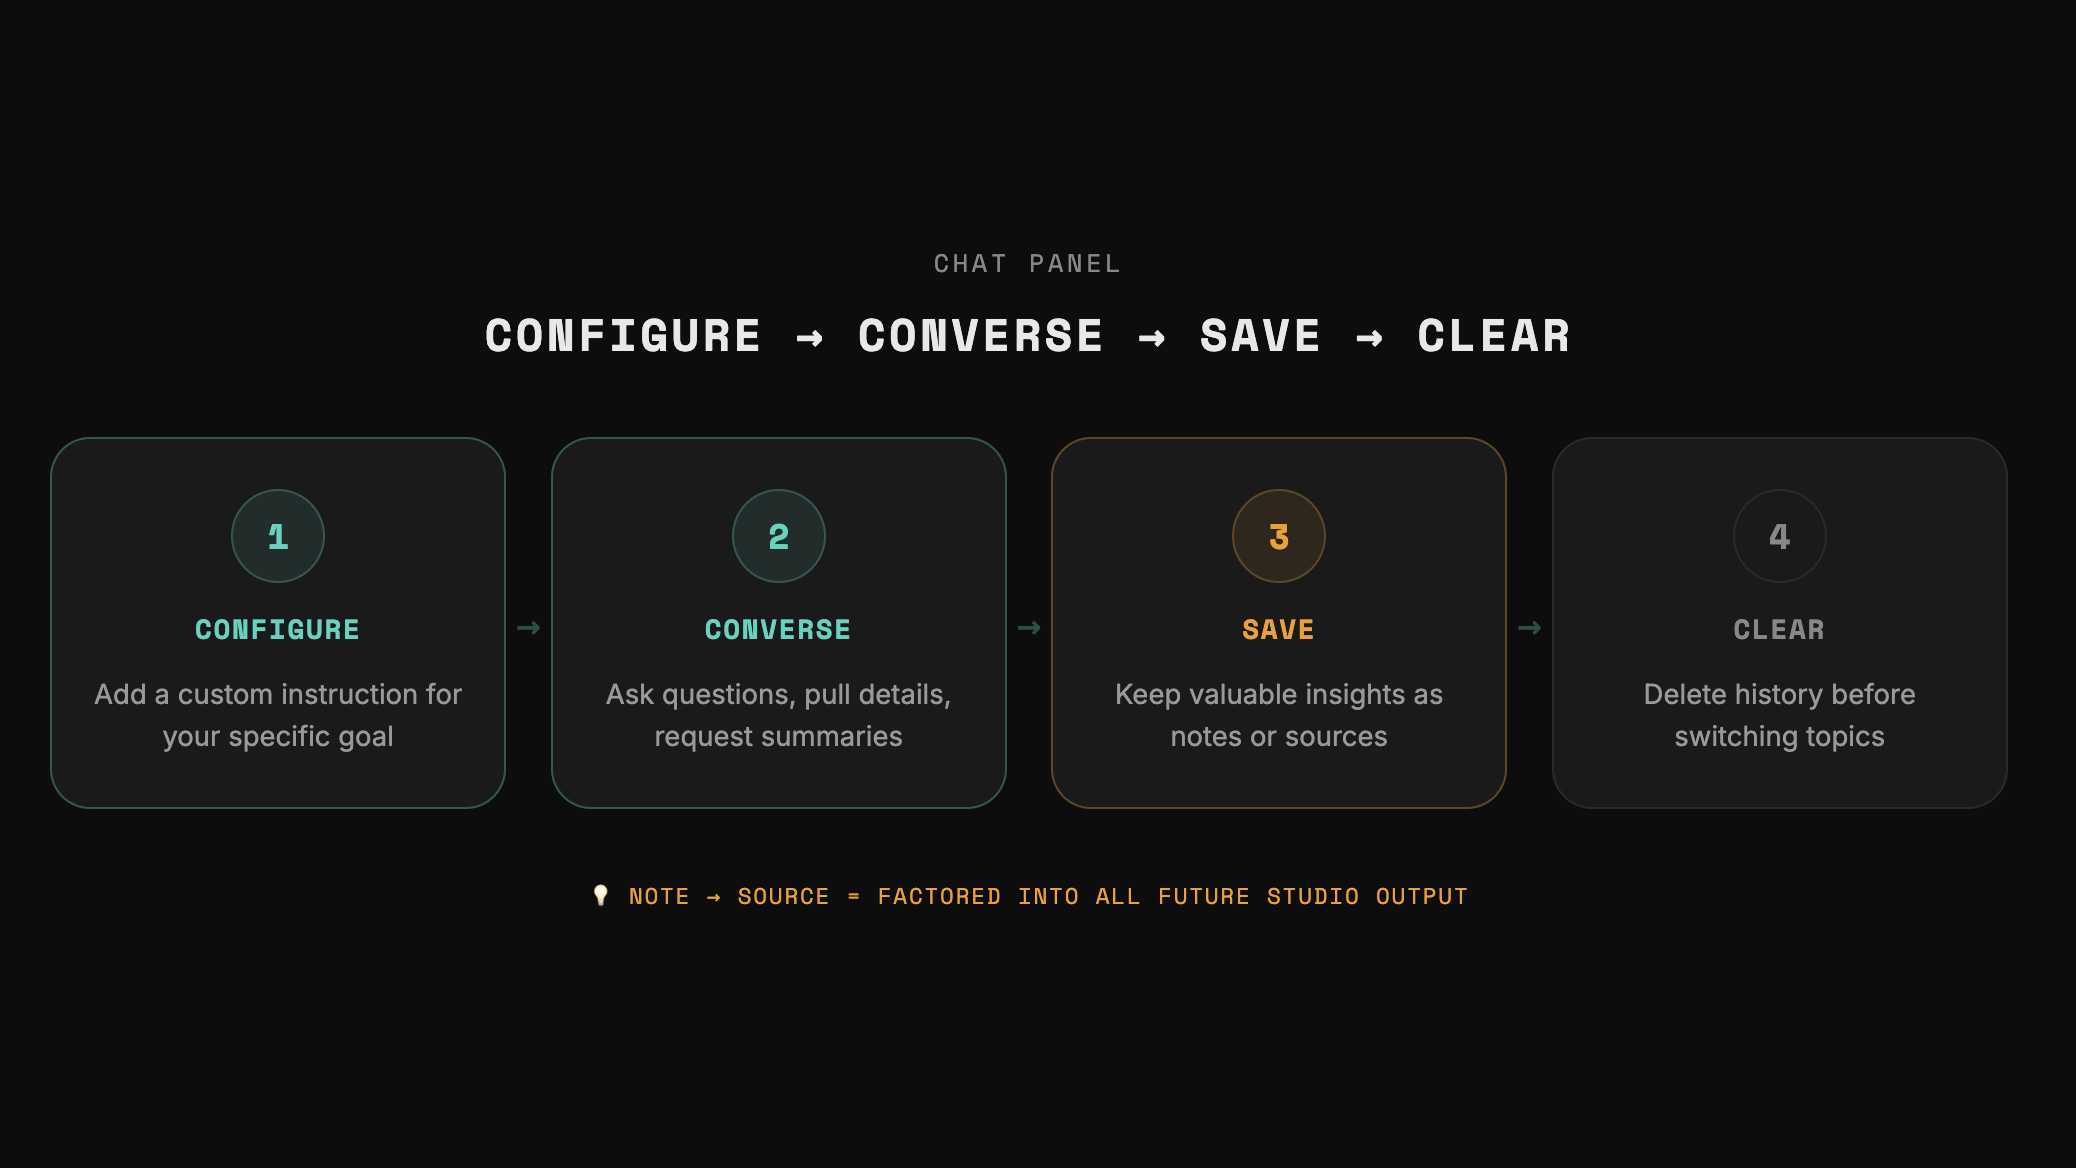
Chat Panel
The most important thing in the Chat panel is the "Configure Chat" feature. For notebooks with high-stakes tasks, you want to add a custom instruction so every response is framed around your specific goal.
- Click here to make a copy of the prompts I showcased in the video.
You can leverage the “Delete Chat History” feature after a few back-and-forths so that the AI isn't influenced by your previous conversations.
But before you delete, check if there's anything worth keeping. If there's a useful data point, save it as a note. If it's a really important insight, turn that note into a source so it gets factored into every future Studio output.
Studio Panel: Tier 1 Tools
The Studio panel has received the most updates, and it's the main reason NotebookLM has evolved from a simple Q&A chatbot into a production tool.
Not every tool here is equally useful though, so I've split them into Tier 1 must-use tools and Tier 2 situational tools.
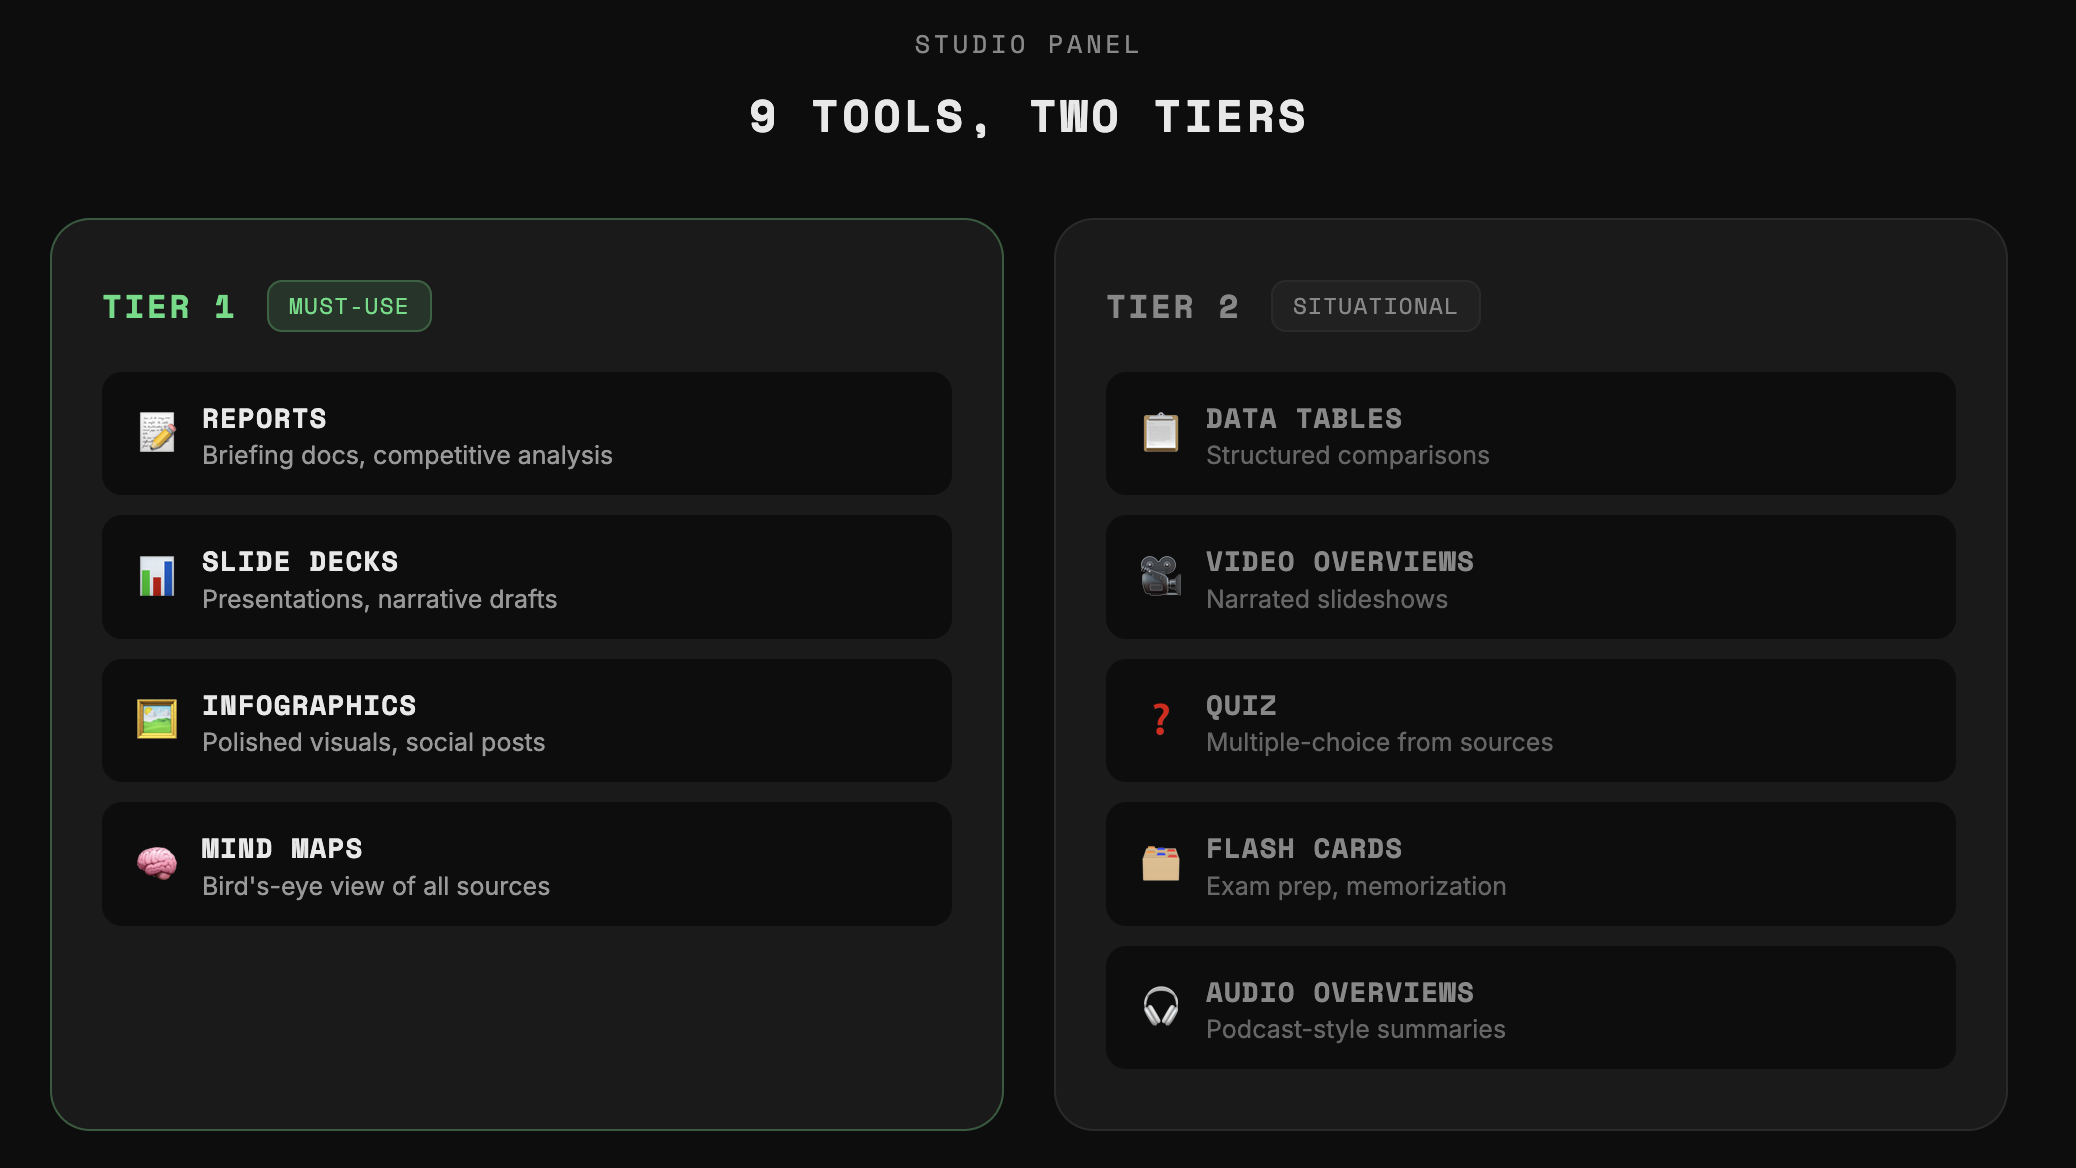
Tool #1: Reports
Reports lets you go from raw sources to a finished briefing doc or competitive analysis in minutes.
When you click Reports, skip the default format options because they're generic. Focus on the Suggested Formats instead, because these are dynamic: NotebookLM analyzes your sources and suggests the most useful directions to take.
Tool #2: Slide Decks
The Slide Deck tool builds a complete presentation directly from your sources, but there is a catch: it's not easy to edit the final output.
After generating a slide deck and downloading it as a PowerPoint, you'll notice the slides are images and not editable elements.
This does NOT mean this tool is useless since an underrated use case is having NotebookLM propose a presentation narrative to cut down brainstorming time.
- For example, your boss tells you to put together a narrative for a keynote. You upload all the information you know you need to include and use the Slide Deck tool to generate a detailed deck first, just to see what narrative it proposes. Now you have a starting point you can build on.
You can also click "Revise" to leave editing instructions on individual slides, and NotebookLM generates an entirely new deck with the changes applied.
Tool #3: Infographics
The Infographic tool turns your sources into a single polished visual you can post or send out right away.
💡 If you have a specific brand guideline, upload it as a source and add "Follow the attached brand guideline for colors, fonts, and design style." NotebookLM will match the infographic to your branding. This applies to Reports and Slide Decks as well.
Tool #4: Mind Maps
The Mind Map tool shows you everything in your sources at a glance, so you know exactly what's worth exploring before you read a single page.
Because mind maps are interactive, I can click on any branch and it opens a chat grounded in my sources about that specific topic.
Studio Panel: Tier 2 Tools
Tier 2 tools are more situational, so I won't go as deep on each one.
Tool #5: Data Tables
Data Tables are useful when you need to pull scattered information from your sources into a structured table you can sort and filter.
- For example, I uploaded pricing pages and feature lists of the top AI models and asked NotebookLM to generate a competitor comparison table. You can export this directly into Google Sheets to refine further.
💡 Other AI tools can generate data tables too, but because NotebookLM is grounded strictly in your sources, I trust the numbers significantly more.
Tool #6: Video Overviews
The Video Overview tool turns your sources into a short narrated slideshow with simple visuals, which is great when you want to watch something instead of read.
I'm a big fan of Ben Thompson's long-form interviews, but I don't want to read through 20-30 pages of text.
- So I upload the transcript into NotebookLM
- Choose the detailed explainer format
- Ask for a breakdown of the top 5 takeaways
After 10-15 minutes, NotebookLM condenses that entire interview into the main arguments with visuals that help me digest the concepts.
Tool #7: Quiz
The Quiz tool generates multiple-choice questions grounded in your sources. I found this surprisingly useful for live events.
At Google, I'd upload the speaker presentations, generate a quiz, then use Slido or Mentimeter to add an interactive element to the event without having to ask speakers to provide questions themselves.
Tool #8: Flash Cards
The Flash Cards tool helps you memorize key terms, concepts, or facts from your sources, which is great for certification exam prep.
You can upload the prep materials, set the difficulty level, and customize the prompt to focus on the hardest questions.
Tool #9: Audio Overviews
To be honest with you, Audio Overviews have mostly been a gimmick for me since for each use case it covers, I can just get the same result faster by typing a question in Chat.
That said, I do use it for longer newsletters that I want to absorb but can't be bothered to read. I turn those into an audio overview and play it from the NotebookLM mobile app while I'm cleaning or commuting.
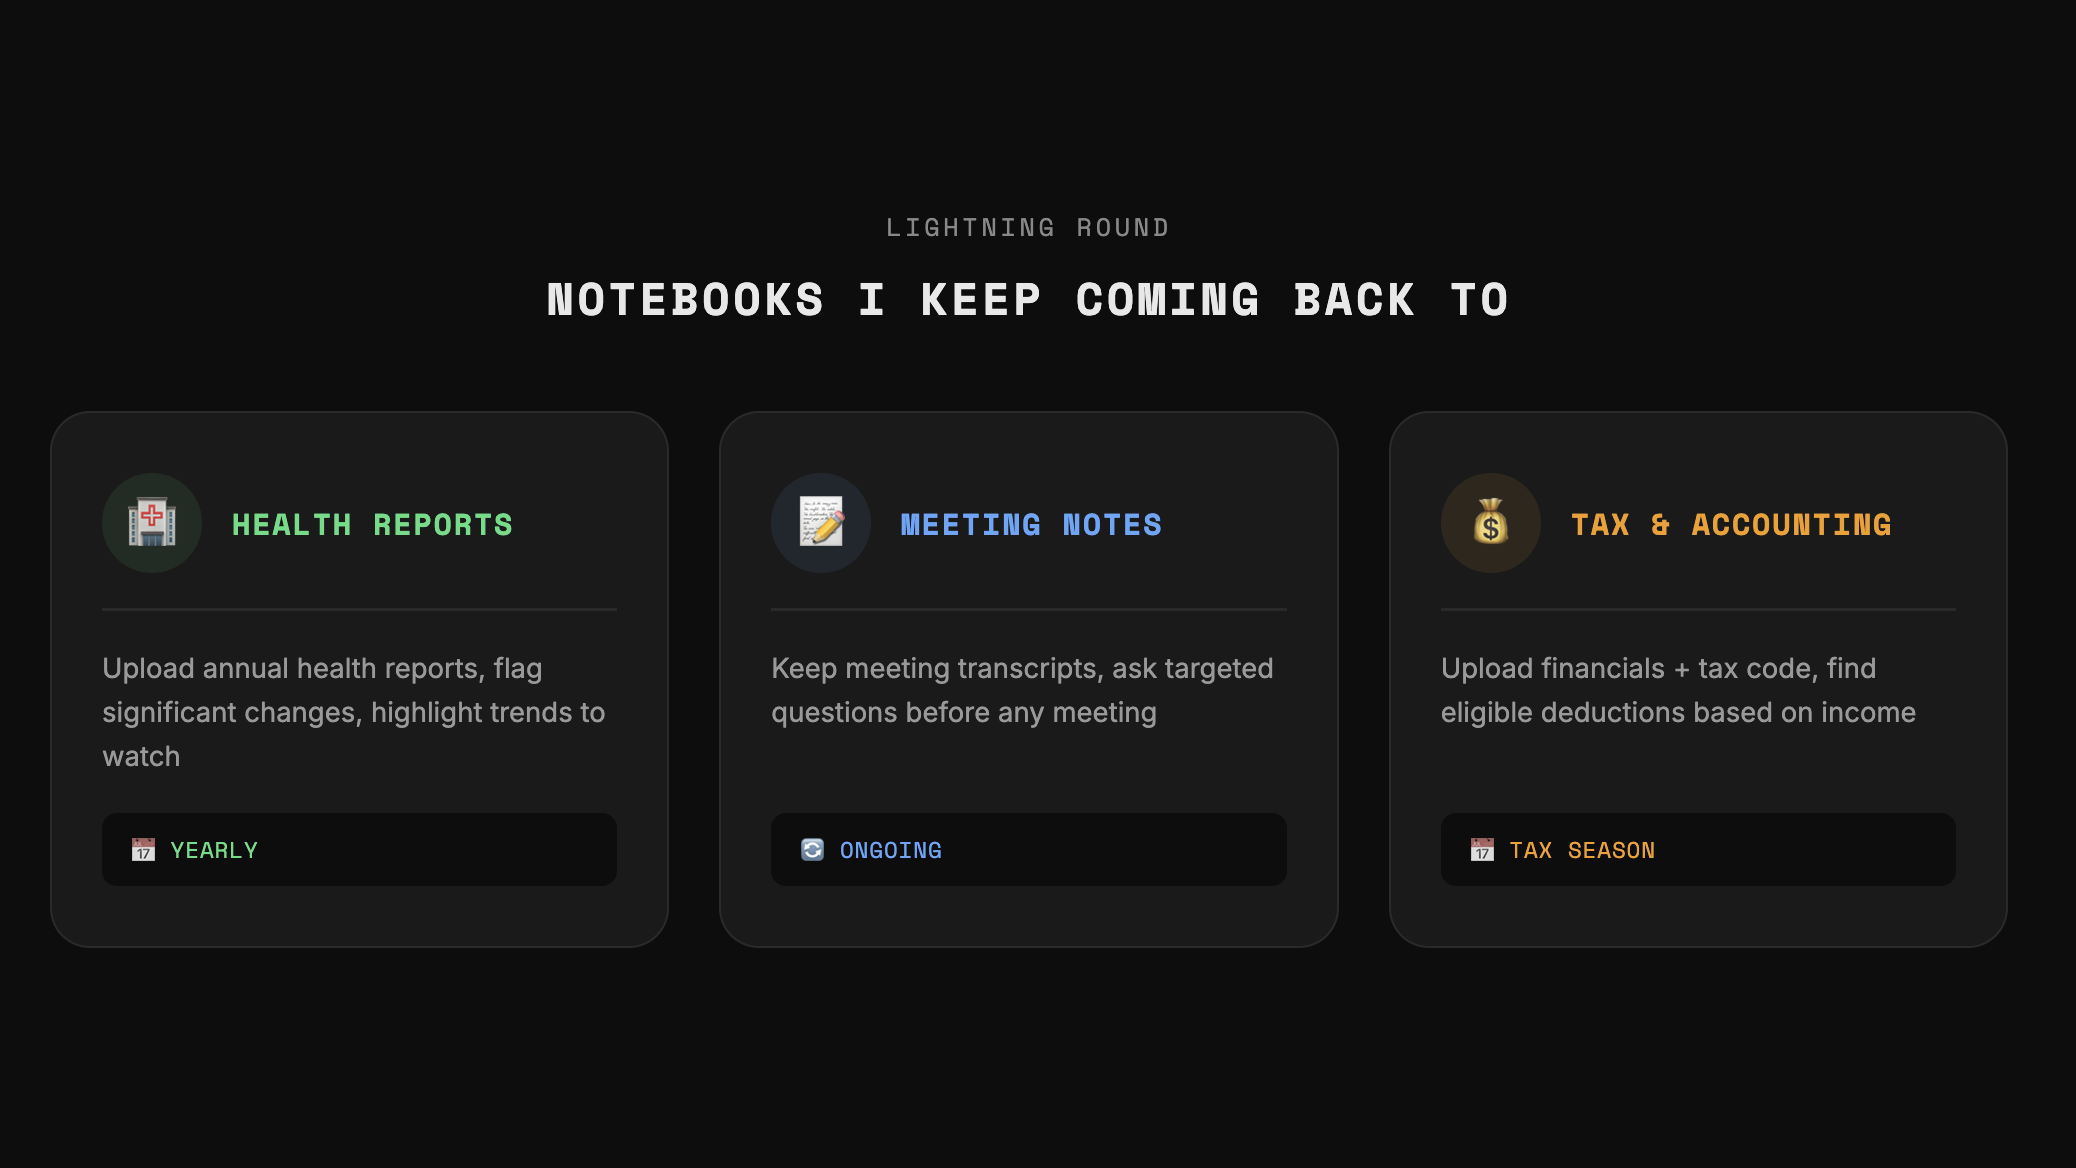
Notebooks I Keep Coming Back To
Here's a lightning round of notebooks I keep coming back to:
- Health Reports. I upload my health reports each year and ask NotebookLM to flag anything that's changed significantly from last year and highlight trends I should watch.
- Meeting Notes Knowledge Base. I keep meeting transcripts in a notebook so that before any meeting, I can ask targeted questions and trust the answers are accurate.
- Tax and Accounting. I upload my financial statements along with the tax code and ask things like "What deductions am I eligible for based on my income and expenses?"
If you enjoyed this...
You might also like: My latest Google Gemini Tutorial!